In this guide we will discuss how to use BLheli with your multicopter, including how to configure and update the firmware on them.
Why is BLheli so popular?
Being open source with an active group of core developers means that the latest and greatest features are constantly being added which is great for all of us who fly multicopters. Traditionally ESC’s where built for fixed wing aircraft or conventional R/C helicopters where sudden changes in motor speed are not always a good thing (stripping gears on traditional helicopters).
So over time as multicopters became more popular and developers where constantly looking at getting better performance a new firmware was written specifically for multicopters. Today BLHeli is the latest and greatest firmware to use on your ESC and is even used for fixed wing aircraft too. Apart from the great performance, it also allows you to easily configure your ESC via PC software. On a small side note, its also worth mentioning SimonK firmware which came just before BLheli which I briefly discuss in our ESC buying guide.
More recently with new hardware advances there is some new features with BLheli_S firmware, but on the face of it BLheli_S and BLHeli can be considered to be the same thing in terms of setup, with BLheli_S ESC just having a few extra features. ESC such as our Cicada series ESC use the latest BLHeli_S firmware which work realy well if you are looking for some new ESC.
ATMEL and SiLabs
Before we get into details its important to note that there are two key types of ESC, ones that use the ATMEL processor, and others that use SiLabs processors, with SiLabs tending to be more popular nowdays.
The reason why its important is that when it comes to configuring and programming your BLHeli BLHeli_S ESC you need to use a USB linker board that compatible with your ESC processor (although if you use cleanflight passthrough mode this is not strictly true, but more on this later).
Nowadays, pretty much all ESC’s and USB linkers are based on SiLabs processors
If you are not sure which one you need, the manufacturer/shop will be able to suggest what USB linker board you need for your ESC. However USB linkers are becoming less popular since many flight controllers support what is known as passthrough mode, which allows you to program your ESC’s via your flight controller, which is discussed below.
How to identify a BLheli ESC?
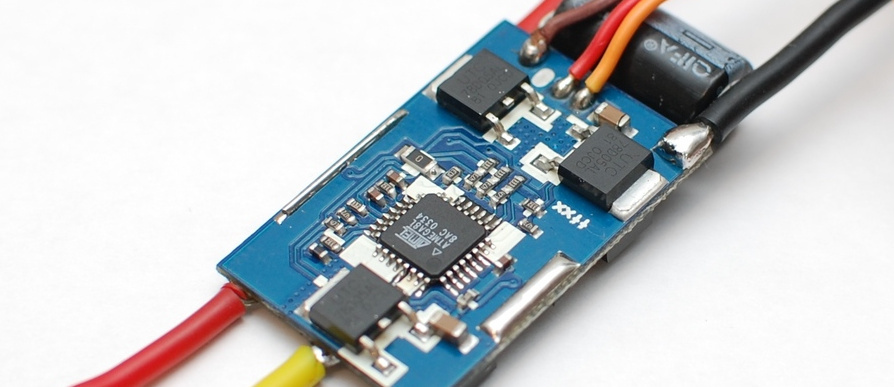
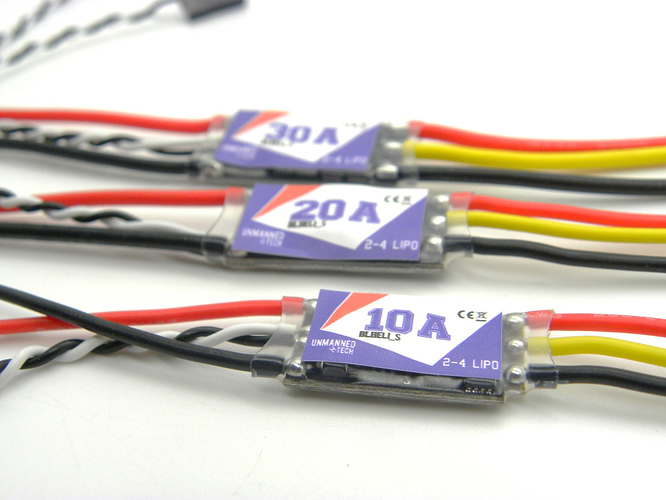
To be honest there is no easy way to know if an ESC has BLheli firmware on it, as it is just software that runs on the ESC. Before you buy one the product description should tell you if it has BLheli on it or not, or the label should mention its a BLheli ESC. And if you are still not sure you can always ask the shop. However as I mentioned essentially every multirotor ESC you can buy today will have BLheli firmware running on it.
BLHeli Suite
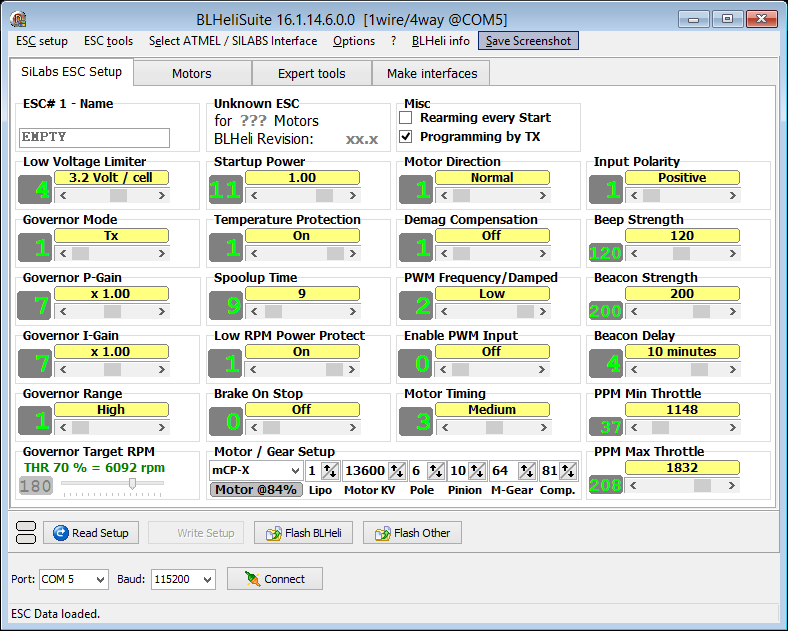
BLHeli suite is a piece of PC software that allows you to configure, and update your ESC on your PC ![]() You can use it with both ATMEL and SiLabs ESC. You can download the latest version here
You can use it with both ATMEL and SiLabs ESC. You can download the latest version here
Safety Warning: Whenever playing around with the settings on a multirotor, always remove the props first to prevent injury or damage. Sometimes a glitch can occur causing the motors to spin up which can cause serius damage, even if the propellers are small.
There are two main methods of connecting your ESC’s to BLheli Suite. The first and best method is via pass-through mode where you connect via your flight controller. The alternative method is via a USB linker device which connects directly to your ESC. Both these methods are described below.
Connecting to BLHeli Suite - Passthrough Mode
I will start with passthrough mode as this is by far the easiest and best method of configuring an updating all your multirotor ESC in one easy go.
If you ever any any issues with this method then you can still use a USBlinker to configure each ESC on its own as some flight controllers do not support this (although its becoming a standard feature on most FC’s)
MAC users: You need Windows to run BLHeliSuite. If you don’t have a Windows computer get one, or you could try using a friends windows PC, allowing them some satisfaction knowing a MAC user needs to use a PC again
Passthough mode allows you to connect to all of your ESC’s at once via your flight controller. To do this you need to obviously have a multirotor built up with its flight controller connected (which has the latest version of cleanflight/betaflight flashed). Passthrough mode simply means your flight controller acts like a USB linker dongle, but its connect to all of your ESC’s at once, so no need to disconnect anything.
To do this you simply need to plug in your USB cable to your flight controller and make sure you are not connected to the cleanflight/betaflight GUI. Open the BLHeliSuite software, plug your battery into your multirotor to power the ESC’s.
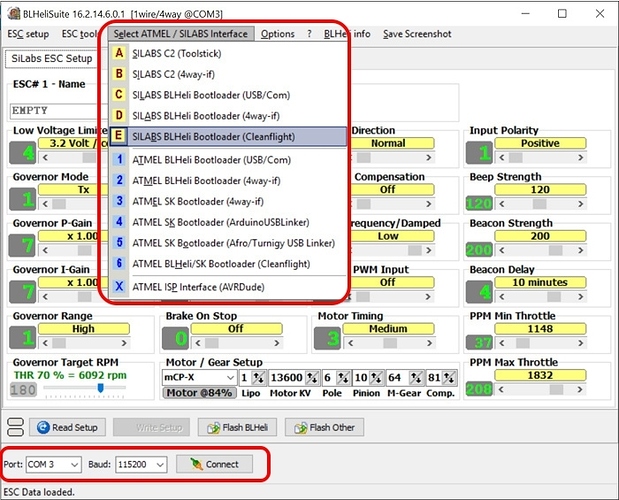
Select the BLHeli Bootloader (Cleanflight) interface within BLheliSuite. Depending on your type of ESC you will need to select SILABS or ATMEL, but BLHelisuite is smart enough to switch if you select the wrong one.
![]()
You will also need to select the COM Port of your flight controller and the buad rate should be 115200, and click connect.
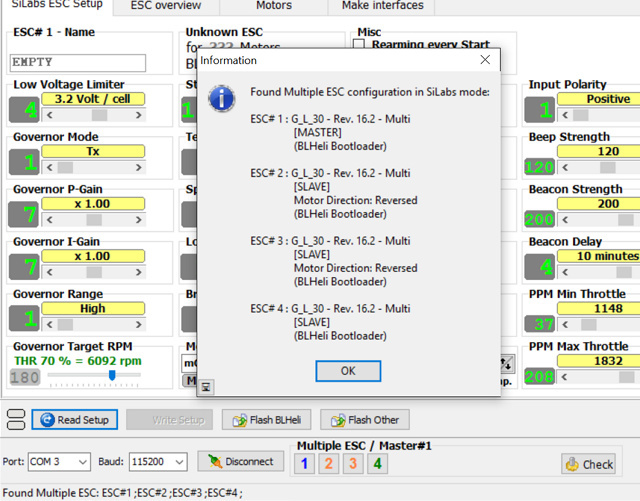
After a few seconds you can click on the Read Setup button and if everything is correct you will see a popup window listing all of the ESC’s that are connected to your FC, including the type of ESC and the firmware version.
Multi ESC Selector
Near the bottom of the BLHeli Suite window you will see the multi ESC selector in passthrough mode. This allows you to select which ESC you want to read/apply the changes to. You can change the parameters of just 1 ESC, or all of them at once depending on what you want to change. For things like mode, breaking, min/max throttle settings its useful to write that to all ESC’s at once, but other parameters like motor direction you would need to change to pairs or motors or individually.

By clicking or right clicking on the numbers you can select and deselect the various ESC’s to change the setting for specific ESC’s.
ESC Overview Tab
A great feature of passthough mode is that is has the ESC overview tab. This allows you to see the settings for all of your ESC’s on one screen to see what values are different and which are the same.
In the screenshot above the differences are highlighted in blue. As you can see the 3rd ESC has no active breaking enabled (PWM Frequency/Damped). However the motor direction is correct as two of the motors need to be reversed on order for the quadcopter to fly stably
Saving Configuration
Once you have changed all the settings it is important to click on the Write Setup button in order for the software to save the settings onto your ESC, otherwise when you turn off the ESC the settings will default back to what they where. I find it usefull to click the read setup button again after saving, just to confirm the correct settings have been saved.
For a practical demonstration here is a great youtube video showing the process of connecting to your ESC via passthrough mode and changing settings/updating the firmware via BLheli Suite.
Passthrough mode troubleshooting
- Make sure your ESC’s are powered - 99% of the time the flight controller will not powe your ESC when its connected via USB only, so you will need to connect your battery
- Are you sure your ESC has BLheli firmware? If you are not sure ask someone here on dronetrest or the shop you purchased your ESC from.
- Make sure your FC is not connected to cleanflight/betaflight GUI - if your flight controller is connected to the PC GUI BLheli suite will not be able to access the flight controller COM port. Sometimes cleanflight/betaflight have an option to automatically connect when it detects your board is connected to your PC.
- Make sure you flight controller supports BLheli passthrough mode
- Your ESC’s dont have the a recent version of BLheli firmware on them that supports passthrough mode - although unlikely, some olders BLheli firmware does not support passtrhough mode (pre 13.2 firmware), read on below on how to upgrade the firmware.
Connecting to BLHeli Suite - USB Linker
If passthrough mode does not work for your situation, its probably better to get a new flight controller/ESC that support that ;-), but there are still some situations where you will still need to use a USB linker.
As with the passthrough mode, there is no need to make a fuss about choosing Atmel vs. SiLabs. BLHeliSuite will connect in either way and will switch to the appropriate mode, if necessary.
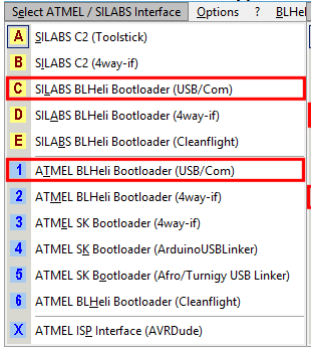
You will then need to select the COM Port of the USB linker device and click connect.
![]()
Then click on the Read Setup button and the software will read all the settings of your ESC.
USB Linker Dongle troubleshooting#
If you are running into issues connecting to your ESC via your USB linker here are a few common issues that you can check for.
- Are you sure your ESC has BLheli firmware? If you are not sure ask someone here on dronetrest or the shop you purchased your ESC from.
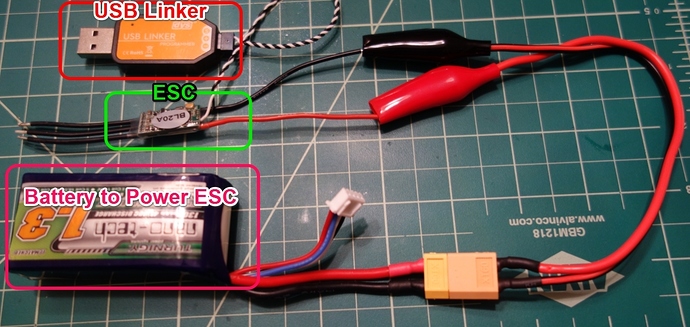
- Make sure your ESC has power from a battery. Generaly a USB linker device does not provide any power to your ESC.
- Do you have the correct drivers installed for your USB linker dongle? Again the shop you purchased your device from will be able to help here.
Updating Firmware
For more information on how to update BLheli ffirmware, and also how to install BLheli onto non BLheli ESC check out our guide on how to flash BLheli Firmware (will be published soon if the link does not work)
Any Questions/ Suggestions
If you have any questions about this feel free to ask. Also if you spotted a mistake, or I left something out please let me know. I sometimes write these guides late at night after a long day at work so sometimes make mistakes!
