The CC3D is a powerful and affordable flight controller that is very popular to use mainly on miniquad copters due to its small form factor. It has many advanced features that you can use if you add a GPS module, even waypoint based flight,. However, most users don’t bother with this for mini quadcopters and just want the basic setup. This post will provide some links and comments to some of the better CC3D setup guides that we have found on the internet. If you have made one, or know of a great guide that I missed, just add a comment with the link so I can add it to the CC3D flight controller guide.
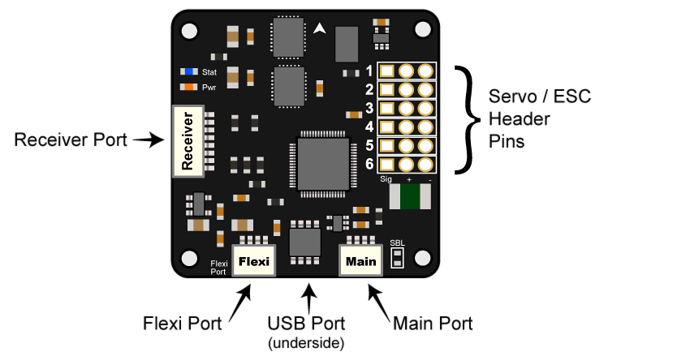
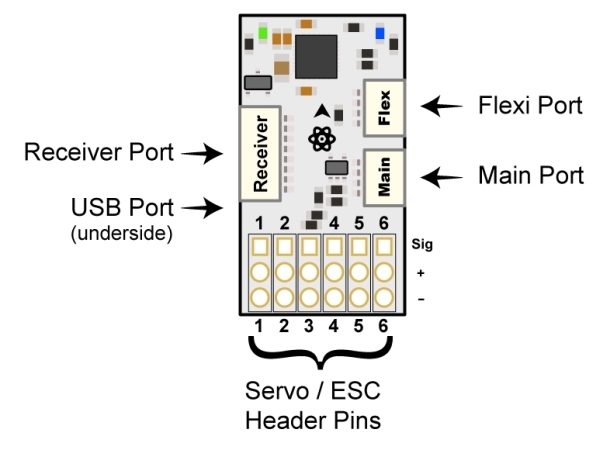
CC3D Board Overview
Useful Links
First things first, here’s the links to the official user manual and software downloads.
- OpenPilot CC3D Manual - this is the openpilot wiki but starts off with a step by step guide showing you how to install and download the required software and run the initial setup of your CC3D board.
- OpenPilot GCS Software Download - You can download the latest openpilot GCS version here, if you have a previous version installed its best to first uninstall it first before installing the latest version. Once installed just follow the initial setup wizard and it will walk you through all the things you need to setup in order to get flying quickly! If you have any issues just look at some of the videos below which illustrate the entire setup process.
Setup Videos
Here are a few videos showing the complete setup process for the CC3D flight controller.
Possibly the better video for taking you through the process step-by-step and the guys (Dennis Baldwin) first impressions of the CC3D (all good!)
In this video he is using a QAV 250 quadcopter, but the setup process is basically the same for any other miniquad.
Receiver Cable Pinout
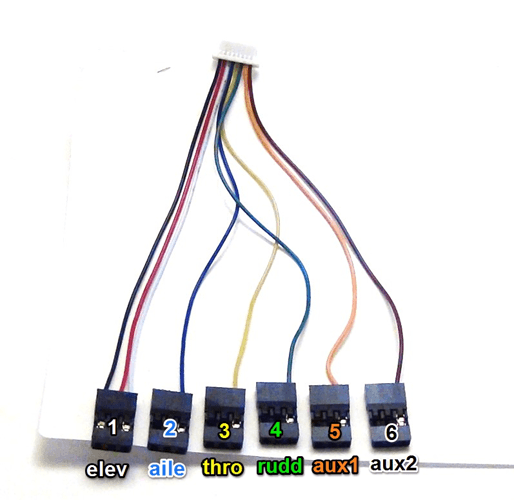
First of all, here’s a useful picture on how you should connect your CC3D to your receiver as sometimes the colours can vary depending on where you purchased your CC3D board from.
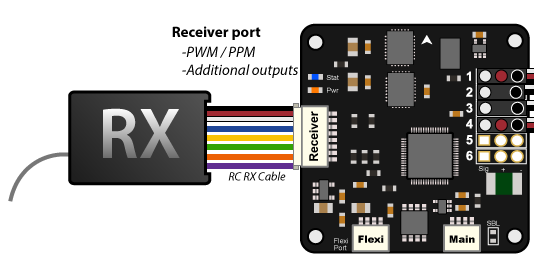
If you are using a PPM receiver you will only need to connect cable 1 (the three wire connector with white, red, and black connectors). If you have a PWM receiver then you will need to connect the cables in the correct order to your receiver. The image below shows the cable numbers and where they need to connect to your receiver. The numbers on the image below correspond to what channel they should be connected to.
Depending on the type of receiver you use, the ports will either be labelled 1-6 or by the names you see above. If you plug these into the receiver as the picture shows, you shouldn’t go wrong. Also note that depending who you buy your CC3D controller from the colours might vary, however.
CC3D Motor Order and Direction
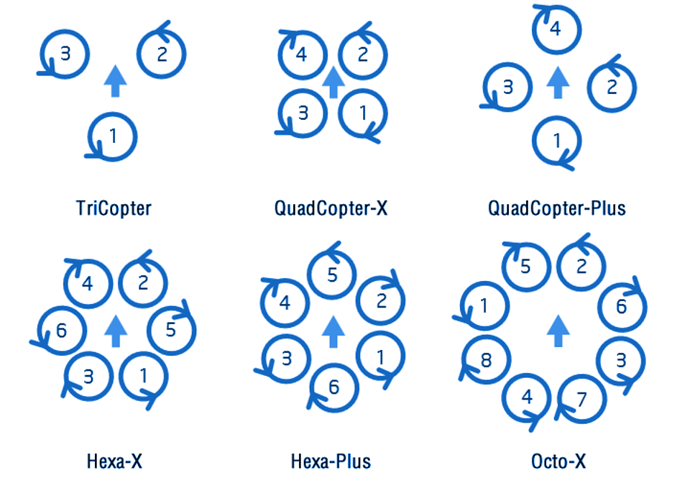
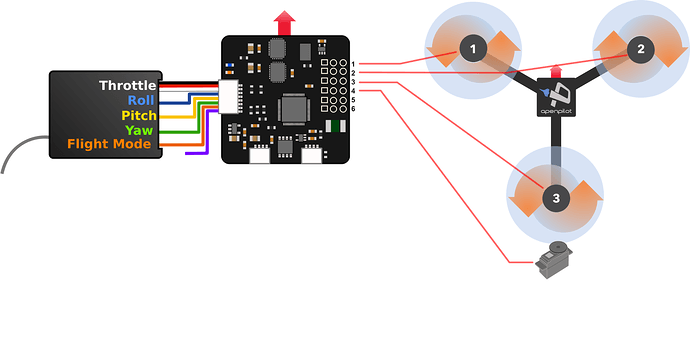
It’s also very useful to know the motor orientation for the CC3D, so that you attach the motors the right way and for connecting the ESCs to the CC3D board correctly. This is the motor orientation for the various multirotor configurations:
For a quadcopter example in the image above - We see the motors labelled 1-4 and the ESCs are connected following this labelling. For example, the ESC for motor 1 is connected to the pins on the CC3D labelled 1.
LED sequence
Here is a great video showing all the various LED sequences on the CC3D board, and explains what each sequence means.
Fine Tuning your CC3D flight controller
For those of you that have progressed though the basic setup easily and want to go on and fine tune your CC3D, here’s a few other videos showing the process.
This is a follow-up video from Dennis Baldwin on the fine tuning. Again, it is helpful and informative. He used a Taranis X9D in this instance.
This is another video showing the PID process for the CC3D on a quadcopter frame, this is more of a video to give you a feel of how things change as you are tuning the PID settings rather than how you change them.
Lastly if you prefer to read a guide on tuning your PID’s, have a look as this basic CC3D tuning guide:
If you have any other useful resources or links just let me know and I will add them
