If you are looking for a flight controller specifically for betaflight, then the omnibus F3 AIO is my favourite. Based on the F303 MCU, along wiht the MPU6000 running on SPI, you can be certain that the performance of this little board will lbe great. However the addition of the OSD (that can be configured via betaflight GUI) and the onboard SD card reading for blackbox logging make this a very impressive flight controller at a great price.
Key Specifications
- STM32 F303 MCU, Runs Betaflight 3.0 firmware
- SBUS/PPM input (Pinheaders)
- 8PWM output (1-4Pinheaders and Sh1.0 Plug, 5-6 as Pinheaders)
- Only 36x36mm, mount holes 30.5x30.5mm
- 128Mb Flash(16M Byte)
- Barometer BMP280
- IR Pins for race timing transponder
- SPI Sensor MPU6000
- SD Card slot
- 2-4S Lipo Direct power
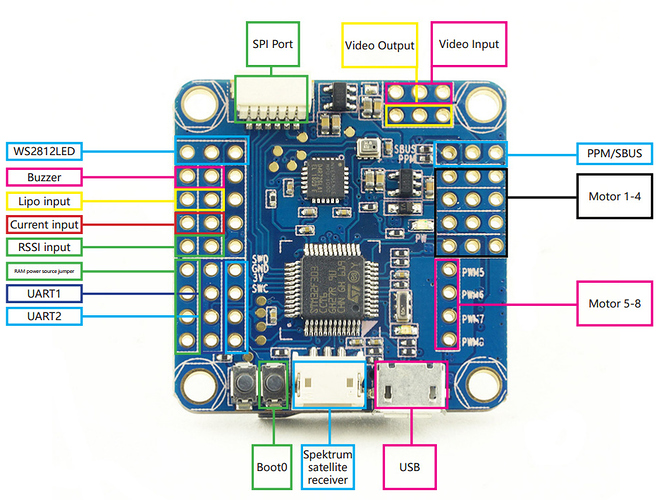
Omnibus F3 AIO Pinout
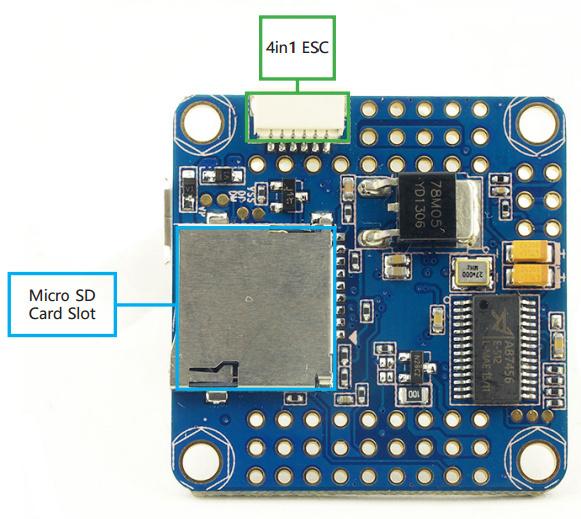
The 4in1 ESC connector is designed to work with the typoon littlebee ESC
BetaFlight Download
This board works best with BetaFlight software, which has a focus on flight performance but is still relatively similar to cleanflight. The GUI is a chrome app which can be downloaded here
This guide will not cover the fundamentals of using betaflight as that can be found in the official Betaflight Wiki
To update the firmware within betaflight you simply need to select the target to be OMNIBUS, more details on using DFU mode for flashing the firmware is detailed later in this guide
Omnibus F3 Pin Map
Powering your Flight controller
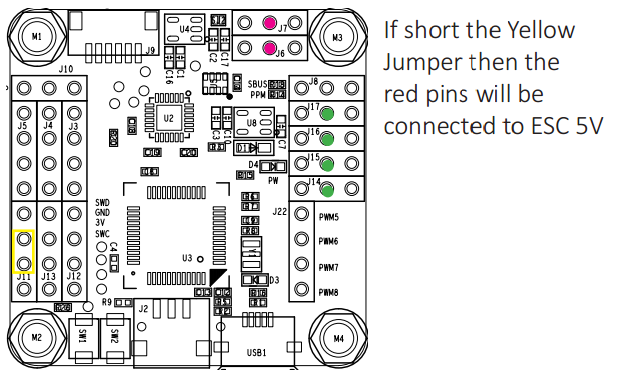
The Omnibus F3 has a 3 position jumper (next to UART1 pins) that is used to select the power source for the board. You can either power it like most other flight controllers, via a 5V supply. Alternatively you can power it directly via your battery supply (up to 4S Lipo only, usualy 12V or 14V).
Powering via Lipo
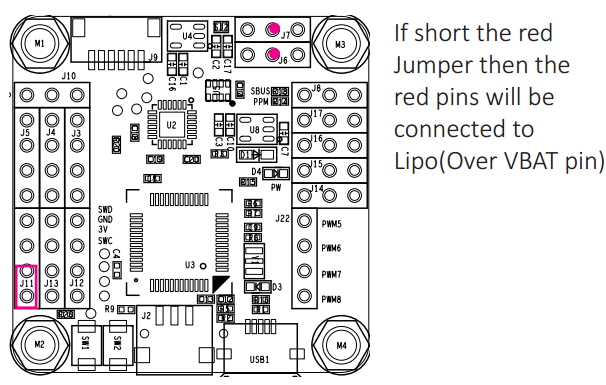
Powering via 5V on ESC rail
Using SBUS or PPM Receivers
The first batch of these boards are set to use PPM by default, to use SBUS on the same pin you need to do some soldering to add an SBUS resistor. However as of August 2016, all the new boards can use the same pin for PPM or SBUS which is set as usual via betaflight configuration GUI. However one thing to bear in mind is that when you are using a PPM reciever, the UART3 port cannot be used.
Removing SBUS resistor
If you desperately need to use the UART3 port for something else, and are using a PPM receiver it is still possible to use both, however it will require some soldering to remove the SBUS resistor on R18.
The PPM pin and SERIAL RX pin are shared between UART3 and PPM. Simply plug in the reciever to the one port and pick PPM or Serial RX in the BetaFlight configurator. This also means that when PPM is in use, UART3 cannot be used. However, if you are out of serial ports, using PPM and need one more, you can remove the SBUS resistor as described below and uncomment this line from the BetaFlight source code #define AVOID_UART3_FOR_PWM_PPM. This will enable both PPM and UART3
Flashing firmware and Zadig Drivers
In order to select the Omnibus target within betaflight you might need to select the option to show unstable releases if the omnibus is not shown on the target list for now. And you will also need to flash in DFU mode which is discussed below.
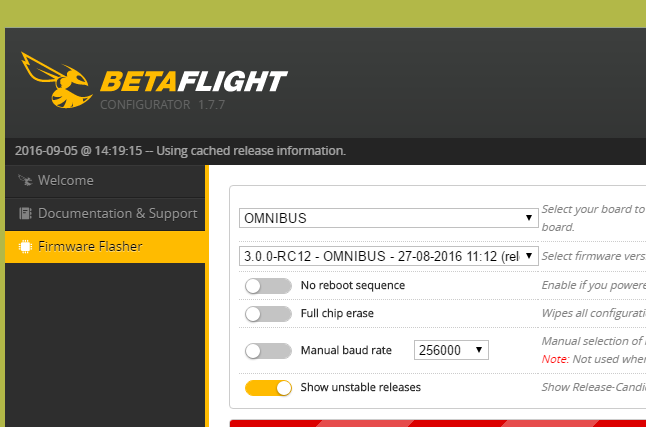
If using windows 10, you will need to flash the board in DFU mode, and to do this you will need to use a program called Zadig which is used to install generic USB drivers so you can talk to the board. You can download Zadig here
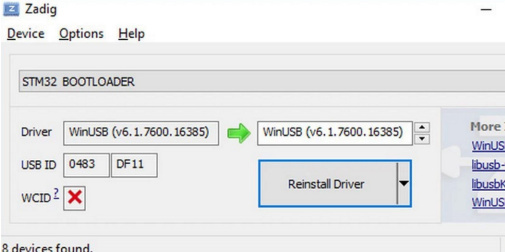
Once installed, open Zadig and select the STM32 Bootloader, and WinUSB as the driver to install the correct driver for the board as shown below
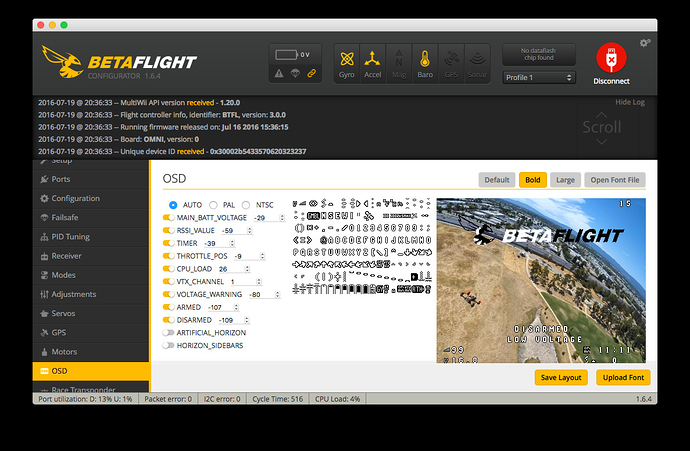
Configuring the OSD
One of the best things about the Betaflight GUI, is the ability to configure your OSD board directly within the software. Now you dont need to care about messing around with MW OSD GUI. Also what is even better is that the latest OSD firmware is included with each betaflight update so you dont need to use arduino IDE anymore to flash new OSD firmware.
If you have any questions or comments about the omnibus AIO F3 please let me know and I will be happy to help!
